Overview

This tutorial introduces you to Cerebras essentials, including data preprocessing, training scripts, configuration files, and checkpoint conversion tools. You’ll learn these concepts by pretraining Meta’s Llama 3 8B on 40,000 lines of Shakespeare. In this quickstart, you will:
  • Set up your environment
  • Preprocess a small dataset
  • Pretrain and evaluate a model
  • Convert your model checkpoint for Hugging Face
In this tutorial, you will train your model for a short while on a small dataset. A high quality model requires a longer training run, as well as a much larger dataset.

Prerequisites

To begin this guide, you must have:
  • Cerebras system access. If you don’t have access, contact Cerebras Support.
  • Completed setup and installation.

Workflow

1

Create Model Directory & Copy Configs

First, save the working directory to an environment variable:
export MODELZOO_PARENT=$(pwd)
Then, create a dedicated folder to store assets (like data and model configs) and generated files (such as processed datasets, checkpoints, and logs):
mkdir pretraining_tutorial
Next, copy the sample configs into your folder. These include model configs, evaluation configs, and data configs.
cp modelzoo/src/cerebras/modelzoo/tutorials/pretraining/* pretraining_tutorial
We use cp here to copy configs specifically designed for this tutorial. For general use with Model Zoo models, we recommend using cszoo config pull. See the CLI command reference for details.
2

Inspect Configs

Before moving on, inspect the configuration files you just copied to confirm that the parameters are set as expected.
To view the model config, run:
cat pretraining_tutorial/model_config.yaml
You should see the following content in your terminal:
########################################
## Pretraining Tutorial Model Config ##
########################################

trainer:
  init:
    model_dir: pretraining_tutorial/model
    backend:
      backend_type: CSX
      cluster_config:
        num_csx: 1
    callbacks:
    - ComputeNorm: {}
    checkpoint:
      steps: 18
    logging:
      log_steps: 1
    loop:
      eval_steps: 5
      max_steps: 18
    model:
      attention_dropout_rate: 0.0
      attention_module: multiquery_attention
      attention_type: scaled_dot_product
      dropout_rate: 0.0
      embedding_dropout_rate: 0.0
      embedding_layer_norm: false
      extra_attention_params:
        num_kv_groups: 8
      filter_size: 14336
      fp16_type: cbfloat16
      hidden_size: 4096
      initializer_range: 0.02
      layer_norm_epsilon: 1.0e-05
      loss_scaling: num_tokens
      loss_weight: 1.0
      max_position_embeddings: 8192
      mixed_precision: true
      nonlinearity: swiglu
      norm_type: rmsnorm
      num_heads: 32
      num_hidden_layers: 32
      pos_scaling_factor: 1.0
      position_embedding_type: rotary
      rope_theta: 500000.0
      rotary_dim: 128
      share_embedding_weights: false
      use_bias_in_output: false
      use_ffn_bias: false
      use_ffn_bias_in_attention: false
      use_projection_bias_in_attention: false
      vocab_size: 128256
    optimizer:
      AdamW:
        betas:
        - 0.9
        - 0.95
        correct_bias: true
        weight_decay: 0.01
    precision:
      enabled: true
      fp16_type: cbfloat16
      log_loss_scale: true
      loss_scaling_factor: dynamic
      max_gradient_norm: 1.0
    schedulers:
    - CosineDecayLR:
        end_learning_rate: 1.0e-05
        initial_learning_rate: 5.0e-05
        total_iters: 18
    seed: 1
  fit:
    train_dataloader:
      batch_size: 8
      data_dir: train_data
      data_processor: GptHDF5MapDataProcessor
      num_workers: 8
      persistent_workers: true
      prefetch_factor: 10
      shuffle: true
      shuffle_seed: 1337
    val_dataloader: &id001
      batch_size: 1
      data_dir: valid_data
      data_processor: GptHDF5MapDataProcessor
      num_workers: 8
      shuffle: false
  validate:
    val_dataloader: *id001
  validate_all:
    val_dataloaders: *id001
To view the evaluation config, run:
cat pretraining_tutorial/eeh_config.yaml
You should see the following content in your terminal:
##############################################################
## Pretraining Tutorial Eleuther Evaluation Harness Config ##
##############################################################
trainer:
  init:
    backend:
      backend_type: CSX
      cluster_config:
        num_csx: 1
    model:
      model_name: llama
      attention_dropout_rate: 0.0
      attention_module: multiquery_attention
      attention_type: scaled_dot_product
      dropout_rate: 0.0
      embedding_dropout_rate: 0.0
      embedding_layer_norm: false
      extra_attention_params:
        num_kv_groups: 8
      filter_size: 14336
      fp16_type: cbfloat16
      hidden_size: 4096
      initializer_range: 0.02
      layer_norm_epsilon: 1.0e-05
      loss_scaling: num_tokens
      loss_weight: 1.0
      max_position_embeddings: 8192
      mixed_precision: true
      nonlinearity: swiglu
      norm_type: rmsnorm
      num_heads: 32
      num_hidden_layers: 32
      pos_scaling_factor: 1.0
      position_embedding_type: rotary
      rope_theta: 500000.0
      rotary_dim: 128
      share_embedding_weights: false
      use_bias_in_output: false
      use_ffn_bias: false
      use_ffn_bias_in_attention: false
      use_projection_bias_in_attention: false
      vocab_size: 128256
    callbacks:
    - EleutherEvalHarness:
      eeh_args:
        tasks: winogrande
        num_fewshot: 0
      keep_data_dir: false
      batch_size: 4
      shuffle: false
      max_sequence_length: 8192
      num_workers: 1
      data_dir: pretraining_tutorial/eeh
      eos_id: 128001
      pretrained_model_name_or_path: baseten/Meta-Llama-3-tokenizer
      flags:
        csx.performance.micro_batch_size: null
To view the data config, run:
cat pretraining_tutorial/train_data_config.yaml
You should see the following content in your terminal:
#############################################
## Pretraining Tutorial Train Data Config ##
#############################################
setup:
    data:
        type: "huggingface"
        source: "karpathy/tiny_shakespeare"
        split: "train"
    mode: "pretraining"
    output_dir: "pretraining_tutorial/train_data"
    processes: 1

processing:
    huggingface_tokenizer: "baseten/Meta-Llama-3-tokenizer"
    write_in_batch: True
    read_hook: "cerebras.modelzoo.data_preparation.data_preprocessing.hooks:text_read_hook"
    read_hook_kwargs:
        data_keys:
            text_key: "text"

dataset:
    use_ftfy: True
3

Preprocess Data

Use your data configs to preprocess your “train” and “validation” datasets:
cszoo data_preprocess run --config pretraining_tutorial/train_data_config.yaml
cszoo data_preprocess run --config pretraining_tutorial/valid_data_config.yaml
You should then see your preprocessed data in pretraining_tutorial/train_data/ and pretraining_tutorial/valid_data/ (see the output_dir parameter in your data configs).
When using the Hugging Face CLI to download a dataset, you may encounter the following error: KeyError: 'tags'This issue occurs due to an outdated version of the huggingface_hub package. To resolve it, update the package by running:pip install --upgrade huggingface_hub==0.26.1
An example of a “train” dataset looks as follows:
{
    "text": "First Citizen:\nBefore we proceed any further, hear me "
}
If you are interested, you can read more about the various parameters and pre-built utilities for preprocessing common data formats. You can also follow end-to-end tutorials for various use cases such as instruction fine-tuning and extending context lengths using position interpolation.
Once you’ve preprocessed your data, you can visualize the outcome:
python $MODELZOO_PARENT/modelzoo/src/cerebras/modelzoo/data_preparation/data_preprocessing/tokenflow/launch_tokenflow.py \
  --output_dir pretraining_tutorial/train_data
In your terminal, you will see a url like 
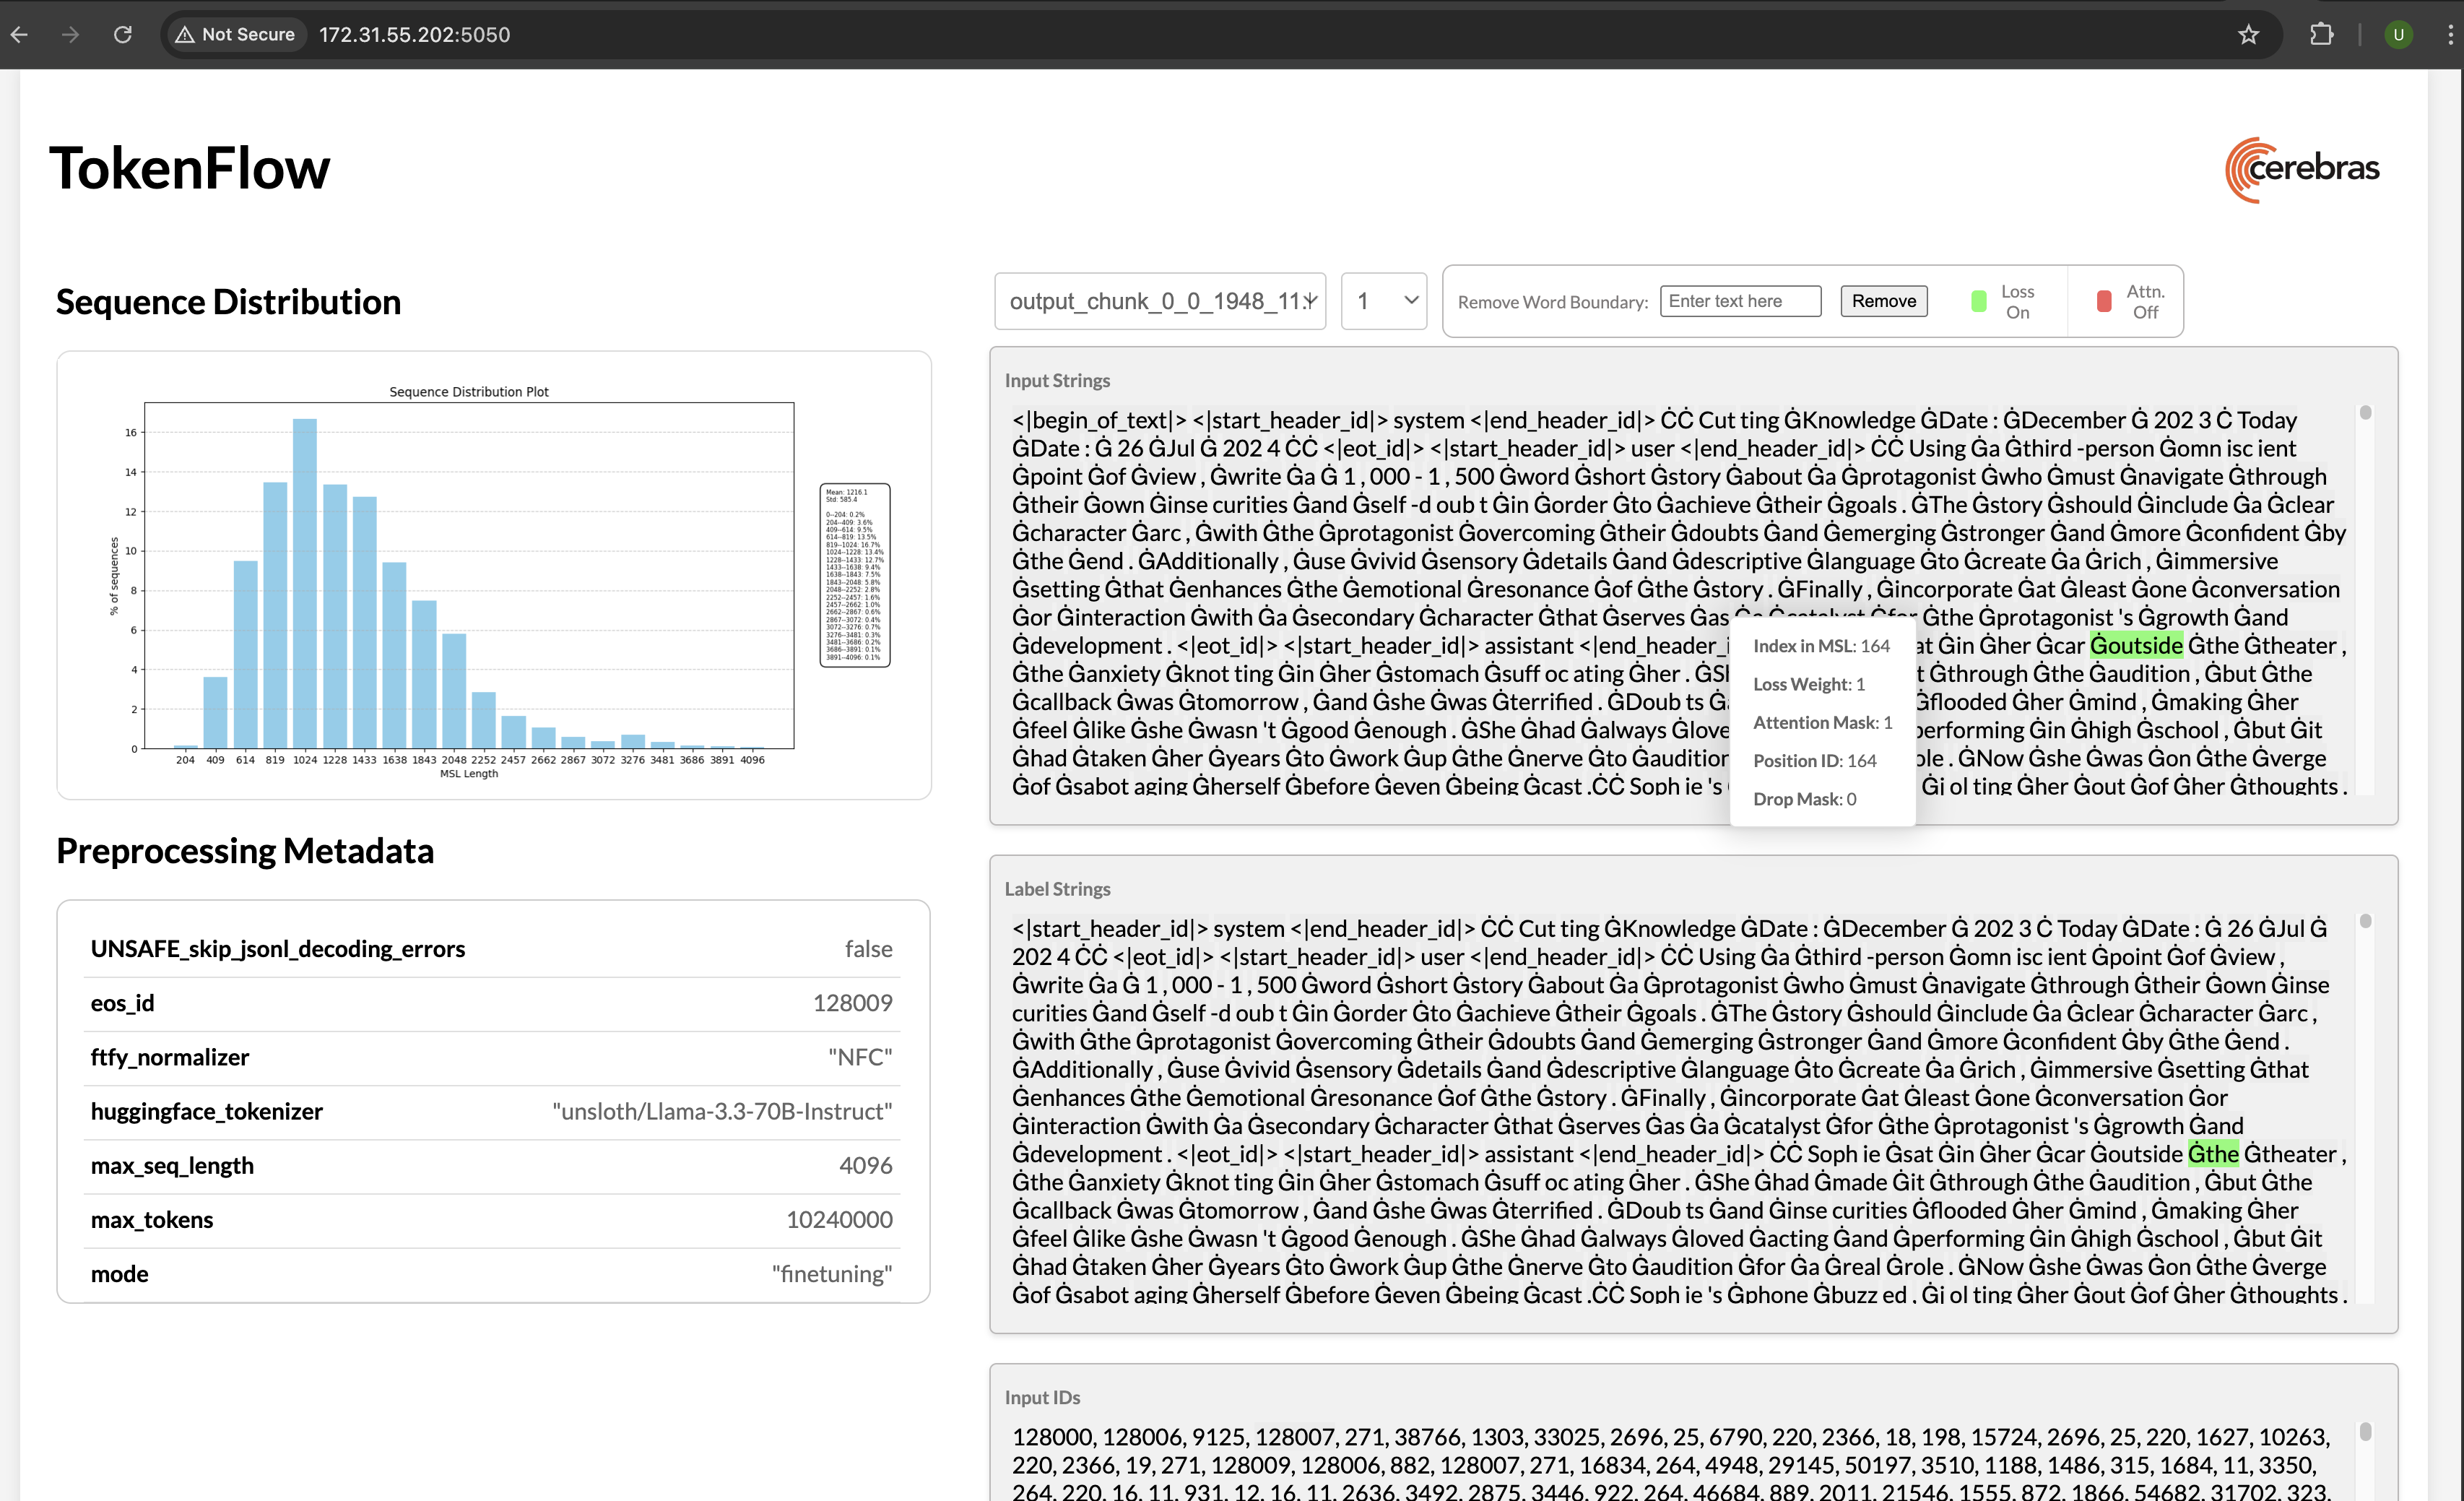
http://172.31.48.239:5000. Copy and paste this into your browser to launch TokenFlow, a tool for interactively visualizing whether loss and attention masks were applied correctly:
4

Train and Evaluate Model

Update train_dataloader.data_dir and val_dataloader.data_dir in your model config to use the absolute paths of your preprocessed data:
sed -i "s|data_dir: train_data|data_dir: ${MODELZOO_PARENT}/pretraining_tutorial/train_data|" \
pretraining_tutorial/model_config.yaml

sed -i "s|data_dir: valid_data|data_dir: ${MODELZOO_PARENT}/pretraining_tutorial/valid_data|" \
pretraining_tutorial/model_config.yaml
Now you’re ready to launch training. Use the cszoo fit command to submit a job, passing in your updated model config. This command automatically uses the locations and packages defined in your config. Click here for more information.
cszoo fit pretraining_tutorial/model_config.yaml --mgmt_namespace <namespace>
You should then see something like this in your terminal:
Transferring weights to server: 100%|██| 1165/1165 [01:00<00:00, 19.33tensors/s]
INFO:   Finished sending initial weights
INFO:   | Train Device=CSX, Step=50, Loss=8.31250, Rate=69.37 samples/sec, GlobalRate=69.37 samples/sec
INFO:   | Train Device=CSX, Step=100, Loss=7.25000, Rate=68.41 samples/sec, GlobalRate=68.56 samples/sec
...
Once training is complete, you will find several artifacts in the pretraining_tutorial/model folder (see the model_dir parameter in your model config). These include:
  • Checkpoints
  • TensorBoard event files
  • Run logs
  • A copy of the model config

Inspect Training Logs

Monitor your training during the run or visualize TensorBoard event files afterwards:
tensorboard --bind_all --logdir="pretraining_tutorial/model"
5

Port Model to Hugging Face

Once you train (and evaluate) your model, you can port it to Hugging Face to generate outputs:
cszoo checkpoint convert --model llama --src-fmt cs-auto --tgt-fmt hf --config pretraining_tutorial/model_config.yaml --output-dir pretraining_tutorial/to_hf pretraining_tutorial/model/checkpoint_0.mdl
This will create both Hugging Face config files and a converted checkpoint under pretraining_tutorial/to_hf.
6

Validate Checkpoint and Configs

You can now generate outputs using Hugging Face:
pip install 'transformers\[torch\]'
python
Python 3.8.16 (default, Mar 18 2024, 18:27:40)    
[GCC 8.4.0] on linux
Type "help", "copyright", "credits" or "license" for more information.

>>> from transformers import AutoTokenizer, AutoModelForCausalLM, AutoConfig

>>> from transformers import pipeline

>>> tokenizer = AutoTokenizer.from_pretrained("baseten/Meta-Llama-3-tokenizer")

>>> config = AutoConfig.from_pretrained("pretraining_tutorial/to_hf/model_config_to_hf.json")

>>> model = AutoModelForCausalLM.from_pretrained(pretrained_model_name_or_path="pretraining_tutorial/to_hf/checkpoint_0_to_hf.bin", config = config)

>>> text = "Generative AI is "

>>> pipe = pipeline("text-generation", model=model, tokenizer=tokenizer)

>>> generated_text = pipe(text, max_length=50, do_sample=False, no_repeat_ngram_size=2, eos_token_id=pipeline.tokenizer.eos_token_id, pad_token_id=pipeline.tokenizer.eos_token_id)[0]

>>> print(generated_text['generated_text'])

>>> exit()
As a reminder, in this quickstart, you did not train your model for very long. A high quality model requires a longer training run, as well as a much larger dataset.

Conclusion

Congratulations! In this tutorial, you followed an end-to-end workflow to pretrain a model on a Cerebras system and learn about essential tools and scripts. As part of this, your learned how to:
  • Setup your environment
  • Preprocess a small dataset
  • Pretrain and evaluate a model
  • Port your model to Hugging Face

What’s Next?